Monday, May 28, 2012

Date Night Mezzaluna Pasta With A Sage and Tarragon Brown Butter Sauce

Shaun and I try to have a date night together at least once every week or two.  Date night means actively doing something together... no TV, no surfing the interwebs on our own laptops, no playing computer games on our own.  Past date nights have included things like dinner out and a movie, learning a new board game together or going bowling, but never have we attempted to cook together in the kitchen.

Sure, he'll occasionally make a meal for us, but he'll banish me from the kitchen while he does it.  When I'm cooking, he's always willing to help, but he's more of a sous chef than a co-chef in those instances.  He'll dice an onion, measure out liquids or set the table, but we have never REALLY cooked together.  This date night was about to change all that, though.  On the docket for this week was a joint effort in the kitchen!

Shaun has always wanted to try making his own pasta, and after a particularly rough week at work for me, he rolled up his sleeves one night when I was going to be late getting home and took care of dinner as a nice gesture.  He made his own pasta dough from scratch.  It turned out so good we decided that we would break our cycle of not cooking together and truly make a meal together.  We settled on using his dough recipe to make some delicious filled pasta while I would come up with the perfect complimenting sauce.  We ended up with some very unique and tasty flavor combinations in our Spinach and Mushroom Stuffed Mezzaluna Pasta with A Sage and Tarragon Brown Butter Sauce.


Pasta Dough
  • 2 cups of all-purpose flour
  • 1/4 teaspoon salt
  • 2 tablespoons water, divided, plus more as needed
  • 2 large eggs
  • 2 teaspoons olive oil
  • 1 egg white
  • 2 additional tablespoons of water
 
Spinach and Mushroom Pasta Filling
  • 1 teaspoon olive oil
  • 1 clove garlic, minced
  • 1/2 medium sized Spanish onion, finely chopped
  • 8 ounces white mushrooms, chopped
  • 1/2 cup ricotta cheese
  • 1/3 cup fresh grated Parmesan cheese
  • 1/2 cup shredded mozzarella cheese
  • 1/2 cup frozen chopped spinach, thawed and squeezed dry
  • Salt and ground black pepper, to taste
 
Brown Butter Sauce
  • 1 stick of butter at room temperature, cut into tablespoon pieces
  • 1 large clove of garlic, crushed and finely chopped
  • 1 cup cherry tomatoes, halved
  • 1 tablespoon fresh sage leaves, roughly chopped, or 1 teaspoon dried ground sage
  • 1 tablespoon fresh tarragon leaves, roughly chopped, or 1 teaspoon dried tarragon
  • Pinch of salt
  • Pinch of ground black pepper 
 
Start by making your dough.  In a large bowl, combine the salt and flour in a large bowl until well combined.  Pour out onto a flat clean surface that you don't mind getting a little flour on.  Make a well in the center of the flour.

In a separate small bowl, lightly beat the eggs and olive oil and a tablespoon of water.  Pour the egg mixture into the well of the flour and begin kneading to combine, forming a dough.

As you knead, add the next tablespoon of water.  If more is required to get all of the flour incorporated, add it in 1/2 tablespoon increments beyond that.  Keep kneading the dough until it becomes one solid piece, about 10 minutes of consistent kneading.  Then, form the dough into one ball and wrap tightly with plastic wrap while you prepare your filling, or up to 2 hours.

For the filling, heat the olive oil in a mediums skillet over medium heat.  Add the garlic and onion and cook until onions start to soften, about 3-4 minutes.  Then add the mushrooms and saute until all liquids have cooked off, about 7 minutes.  Remove from heat and cool completely in.

While the mushrooms, onion and garlic are cooling, mix the ricotta, Parmesan, mozzarella and spinach in a medium sized bowl.  Once cooled, add in the mushroom mixture.  You want to be sure this is cooled completely or you will melt your the cheeses for your filling.  Season the filling with salt and pepper to taste and set aside in the refrigerator until needed.

Once the dough has had a chance to rest and the filling is made, it is time to begin making your mezzaluna pasta.  To start, beat the white of one egg with 2 tablespoons of water to make an egg wash.  Set aside.

Roll out the dough to about 1/8 to 1/16 of an inch thickness on a lightly floured clean surface.  It often works best to lightly flour the rolling pin as well.  As you roll out the dough, it is important to roll evenly, so start from the middle and roll to an edge, making sure to consistently turn and flip the dough.  Once it has reached the desired thickness, use a round ravioli stamp if you have one to cut out evenly sized round shapes, getting as close as possible to the last shape cut.  Make sure to gather all of your scraps, as you will be able to re-roll these out to get the most mezzaluna possible out of your dough.  If you don't have a round ravioli stamp, don't worry!  You can use the top of any standard sized drinking glass or coffee mug.  Simply place the stamp or glass and press down firmly and twist as you press to be sure to cut the shape from the sheet of dough.

Once you have all of your shapes cut out, go back and roll each individual shape out as thin as you can get it without causing any tearing or holes to form, slightly thicker than paper.  Then re-stamp or re-press each newly rolled shape back into the original size you wanted.  At this point, you can re-roll the scraps again to get one or two more circles out, if your patience is still with you.  If not, you can discard these scraps and no one will know...

Place about a dollop of filling in the center of each circle, no more than 1/2-to-2/3 of a tablespoon.  Using a fingertip, lightly spread some of the egg wash around the edges of the circle, then fold the dough over the filling to meet the opposite edge evenly, making a half circle.  Gently press the edges to seal the filling in, and then crimp the very edges using a fork, pressing lightly.  Continue for all pieces of the dough.

**The recipe may be completed in advance to this point.**

For Later Serving: If you're not quite ready to finish this dish off and want to enjoy it at a later time, the pasta can be refrigerated for up to a week at this point.  When you're ready to cook it, just add a minute or two to the cooking time, as the dough and filling will be much colder, and resume with the instructions below.

For immediate serving: Bring a pot of lightly salted water to a boil.  As the water comes to a boil, begin the brown butter sauce.

In a large stainless steel skillet, melt 1 tablespoon of butter over medium heat.  Add the garlic and cook for about 1 minute.  Add 3 more tablespoons of butter and melt until lightly bubbling, about 2 minutes, stirring frequently.

At this point, you should gently place your pasta in the boiling water and boil until the pasta is floating and has puffed up slightly, about 5-6 minutes.  When done, drain and move to a serving bowl.

Going back to the sauce, add in the remaining butter and cherry tomatoes.  Cook until the butter has come to a bubble, about 5-6 minutes.  Add in the sage and tarragon at this point and continue cooking until the bubbling has subsided and the butter has turned a light golden brown color and has a rich, nutty aroma, about 1-2 minutes.  Add salt and pepper to taste and pour over your mezzaluna.

A Note on Browning Butter
Butter should always be browned in a stainless steel skillet, if possible.  A large part of what browns butter nicely is when it begins to just cook and adhere to the bottom of the pan, which is why it is important to frequently stir.  Otherwise, you'll end up with burnt butter, not brown butter.  When you use a non-stick skillet, the butter doesn't have the chance to stick to the bottom of the pan and it never quite browns; it just goes from melted to overcooked and burnt tasting.  Most non-stick skillets are also black, so you won't really have a chance to see the color changing on the butter.
 
Plating this one can be done in several ways; it really depends on your mood and the company you're preparing the meal for.  I've showcased both in this post.  The first is to serve it family style.  Place all the mezzaluna in a large pasta bowl, pour the sauce over them and have people serve themselves table side.  Alternatively, you can place 4 or 5 mezzaluna on a longer rectangular plate, flat side down, and drizzle the sauce over the pasta.  Either way, they'll taste just as good!

At this point, some of you may be wondering what the difference between a ravioli and a mezzaluna pasta shape is.  Well, let me tell you, and then use this tidbit as a great conversation started about the dinner to fascinate your guests.  Ravioli are generally round or square-cut filled pasta, whereas mezzaluna pasta are made in a half moon shape, as the name implies: "mezzaluna" meaning "half moon" in Italian. 

A note for you before you get started on this meal, though: be prepared to invest an entire evening to this one... making your own pasta, especially a filled pasta is not a quick task.  It is a labor of love.  Share this labor of love with someone you love, though, and the time will fly right by!  When the two of you sit down to eat, you'll both have beaming smiles when you look at the amazing meal you prepared together.  I know Shaun and I looked up at each other, smiled, gave each other a congratulatory high five across the table, yawned out of exhaustion and said, "Goodnight!"

8MMETRG48PGA

Saturday, May 19, 2012

A Pic-a-nic Lunch of Pork Burgers With Creamy Parmesan Pasta Salad

Finally!  A nice weekend to sit out on the patio with a good drink and an even better lunch!  Nice weather like we're having this weekend always makes me think of picnics.  The gathering of friends and family to catch up in the great outdoors; the games of badminton, bocce and lawn darts we played (I was a mean badminton player in my youth); but most importantly, the food!  My stepfather would always fire up the grill and throw on the classic picnic foods - hot dogs, barbecue chicken breasts, corn on the cob and my favorite, cheeseburgers.  There's just something about a good, juicy burger on a nice bun with the right fixin's and the classic sides of potato salad, corn on the cob, pasta salad and garden salad that mom would put together in the kitchen that makes me a happy guy.  Our family picnics always bring back happy memories for me.

As much as I would have loved to have had a picnic of my own this weekend to begin creating those same memories with Shaun and our friends who are like our second families, things just don't always fall in to place.  However, that didn't stop Shaun and I from sitting out on the patio with a cold vodka lemonade or beer and a lunch of my favorite picnic foods.  I didn't just throw a burger on the grill, though.  This is me, after all.  I had to do something to twist it just a little bit.  I put a spin on the the classic burger by making a pork burger with bacon and sage and kicked up the traditional pasta salad with my own creamy Parmesan dressing.  A perfect lunch of Perfect Pork Burgers With Creamy Parmesan Pasta Salad.


Perfect Pork Burgers
  • 5 slices of bacon
  • 1 clove of garlic, minced
  • 1 pound ground pork
  • Kosher salt and ground black pepper
  • 1/4 teaspoon dried sage
  • 1/4 teaspoon onion powder
  • Ground black pepper
  • 4 potato buns or rolls, split
  • 1/8 of a cup creamy Parmesan dressing (recipe follows)
  • 1/2 cup shredded cheddar cheese
  • Tomato slices
  • 1 head of Romain lettuce, torn
  • Red onion slices

 Creamy Parmesan Pasta Salad
  • 1/2 lb of bow tie pasta, or any pasta you like
  • 1 cup cubed ham
  • 1/2 cup shredded carrot
  • 1/2 cup frozen peas, blanched
  • 1/2 cup red onion, diced
  • 1/2 cup red bell pepper, diced
  • 1/2 cup shredded cheddar cheese
  • 1/3 cup mayonnaise
  • 1/3 cup sour cream
  • 1 tablespoon and 1 teaspoon lemon juice
  • 3/4 teaspoon minced garlic
  • 1 cup fresh grated Parmesan
  • Salt and pepper to taste


First things, first.  Bring a pot of salted water to a boil and cook the pasta per the directions on the package.  I used a bow tie pasta of sorts, but wagon wheels, rigatoni, elbows, shells, penne or even tortellini would work just as well. Once done, drain, run under cold water and transfer to a large bowl.

For the ham, I get one slice of 1/2 inch thick ham from the deli at my local grocery store and cube it myself.  (This will often generate more than a cup, especially if its a larger piece of ham.  Feel free to toss a little more in, or save the rest as it goes really nice on top of a salad!)  Toss in to the bowl with the pasta along with the shredded carrots, blanched frozen peas (see instructions for blanching below), red onion and red bell pepper.  Lastly, toss in your shredded cheddar cheese.  If you prefer more of a meaty pasta salad and less of a cheesy one, swap the shredded cheddar for a half cup of cooked and crumbled bacon.

Blanching Vegetables
To blanch the peas, or any vegetable, place them in a pot of boiling water until they are bright in color and tender-crisp, usually a minute to a minute and a half.  Then drain them immediately and place them in a bowl of ice water to stop the cooking, allowing them to retain their crispness and not become soggy or mushy. 

For the creamy Parmesan dressing, mix the mayonnaise, sour cream, lemon juice, garlic and Parmesan with a little salt and pepper to taste.  Whisk until smooth and creamy, will all ingredients incorporated.  Set aside 1/8 cup of the dressing for the burgers and dress the pasta salad with the rest.  Toss to coat and season with a little more salt and pepper to taste.  Cover the bowl with plastic wrap and chill for up to 3 hours while you prepare and cook the burgers.

While the pasta salad chills, prep your burgers.  Start by pulsing the uncooked bacon and clove of garlic in a food processor until coarsely ground.  Combine the ground pork, 1 teaspoon of kosher salt, 1/4 teaspoon of ground black pepper, onion powder and the sage in a large mixing bowl.  Add the bacon mixture and gently mix with your hands.  Form the meat into 4 balls, then gently press into 4-inch-wide, 1-inch-thick patties.  You should end up with 4 burgers.  Make sure to make a 2-inch-wide indentation with your thumb into the center of each patty to prevent the burgers from bulging in the center.  This will also help them cook much more evenly.

Preheat your grill or grill pan to medium heat.  Lightly season the patties with a little more pepper.  Place them on the grill and cook WITHOUT TOUCHING THEM or pressing down on them until marked on the bottom, about 5-6 minutes.  Flip them once and continue to grill, again without pressing them until the other side is marked and the patties are firm, about 4-5 more minutes.  When there is about 1-2 minute left, evenly divide the shredded cheddar to the tops of the burgers.  You should NEVER press a burger during cooking, as it will force all of the juices out of the burger, drying it out so you'll be left with a nice little hockey puck.  Touch a burger of any kind as little as possible during cooking to end up with a juicy and delicious, evenly cooked patty.

Meanwhile, while the burgers are cooking, keep yourself busy to resist touching them by slicing the tomato, lettuce and onion to top them off.  Then spread a little of the reserved creamy Parmesan dressing from the pasta salad on the cut side of the bottom of each bun.  Place the patties on the buns and top with the classic fixin's.

So there you have it.  A nice summery picnic food lunch to enjoy for your next cookout.  The bacon in the pork burger gives a little fat and flavor to the lean meat.  The homemade dressing on the pasta salad will give a creamy texture that no store bought dressing will give it.  Just be sure to eat AFTER your badminton game... moving around like that after eating ends poorly for everyone!


Monday, May 7, 2012

Grape Expectations! Oh... and Pork, Too!

Per my usual Sunday morning routine, I was sitting on the sofa flipping through the barrage of magazines I receive each week - travel magazines, wedding magazines, lifestyle magazines, fashion magazines, trashy gossip magazines and of course - cooking magazines!  Well, this past Sunday morning, it was a cooking magazine week.  A few months back, Shaun cashed in a few credit card rewards points and surprised me with a subscription to a new cooking magazine (what a sweet future husband I have, I know...).  This new one was added to my rotation along with Food Network, Cooking Light and Bon Appetite.

As I flipped through the May issue of this new magazine, I was extolling to Shaun about why the magazine was such a waste to me.  4 months of reading it and I had yet to find a single recipe I actually wanted to make at home.  Sure, some sounded good, but they were a bit pretentious.  Now I freely admit, I am a professed foodie and have a tendency to be a bit pretentious with some of my meals, but this magazine made me look like a cook at your local diner.  Just as I was about to say it was a good thing the magazine was free, I came across a recipe I actually wanted to try!  I could hardly hide my shock.

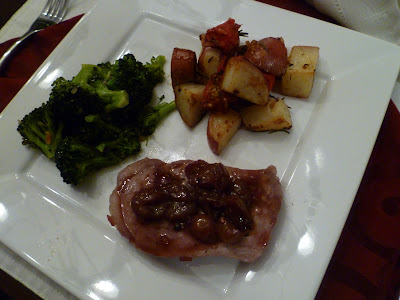
I shared it with Shaun and we decided there was no better night to try our first recipe from this magazine than the present one.  We also decided to share our little discovery and (hopefully) deliciously pretentious meal with some close friends.  We immediately invited our Providence gay BFFs over for a Sunday dinner of Pork with Grapes and Tarragon, Roasted Potatoes and Tomatoes, and Steamed Broccoli with Garlic, Shallot and Tarragon.


Pork with Grapes and Tarragon


I freely admit I was a little hesitant of combining the flavors of grapes and tarragon together.  The dish was surprisingly rich for something so low in fat, though.  This is thanks in part to the tannins in red grapes.  I don't advise making this dish with green grapes though, as it will end up lacking some of the complexity, flavor and texture.
  • 2 tablespoons extra-virgin olive oil
  • 8 4-ounce boneless pork loin chops
  • Kosher salt and freshly ground black pepper
  • 2 cups black or red seedless grapes (12 ounces), halved
  • 2 tablespoons minced shallot
  • 1 tablespoon sugar
  • 1 tablespoon red wine vinegar
  • 1/2 cup dry, fruity red wine
  • 1 cup chicken stock or low-sodium broth
  • 2 teaspoons chopped tarragon


Roasted Potatoes and Tomatoes
  • 1 1/2 pounds large red-skinned potatoes, cut into eights.
  • 2 tablespoons olive oil
  • 1 pint cherry tomatoes
  • 3 sprigs of rosemary
  • 3 cloves of garlic, smashed
  • Salt and pepper


Steamed Broccoli with Garlic, Shallot and Tarragon
  • 1 1/2 pounds broccoli crowns
  • 1 1/2 tablespoons olive oil
  • 1 shallot, minced
  • 4 cloves garlic, minced
  • 1 teaspoon tarragon, finely chopped
  • Salt and pepper
Place a baking sheet in the oven and preheat to 450 degrees for the roasted potatoes.

Set a steamer basket over an inch of water in a deep skillet or saute pan to steam the broccoli in and bring the water to a boil.  Once the water comes to a rapid boil, add the broccoli to the steamer basket and steam the broccoli until it is bright green in color, but maintains some of its crispness, about 3-4 minutes.  Do not over steam or you will have mushy broccoli.  Set the broccoli aside, once steamed.

While the oven is preheating, heat your olive oil for the pork in a very large skillet (I use my paella pan).  Season your pork chops liberally on both sides with kosher salt and fresh ground black pepper.  Add the pork to the skillet and cook over medium-high heat, turning once, until lightly browned and nearly cooked through, about 6 minutes.  Do not cook the pork completely, as it will continue to cook later on.  Once done, transfer the pork to a plate, cover loosely to keep warm and set aside.


While the pork is cooking, toss your potato wedges with 2 tablespoons of olive oil, the cherry tomatoes and your sprigs of rosemary, then season to taste with salt and pepper.  Remove your preheated baking sheet from the over, place the vegetable mixture on the sheet and return to the oven, roasting for 15 minutes.  Flip the mixture after 15 minutes and return to the oven for an additional 10 minutes.  When done, remove from the oven and place the roasted vegetables in a serving dish immediately to stop further roasting, causing the potatoes to turn mushy.  Cover to keep warm until ready to serve.

Once your pork is removed from the pan, add the grapes to the skillet and cook until lightly browned, about 3 minutes.  Add the shallots and sugar and cook, stirring constantly, until the sugar has dissolved, about 1 minute.  Add the vinegar and cook until it is almost evaporated, approximately 1 more minute.  Next, add the red wine and bring to a boil over high heat until reduced by half, stirring occasionally.  This will take about 3 minutes.  Once reduced, add the chicken stock or broth and boil until this also has reduced by half, about 4 additional minutes.

As the wine and broth for the pork are boiling, heat the olive oil for the broccoli in a large skillet over medium heat.  Add in the minced shallot and garlic and saute until lightly browned and fragrant, about 2-3 minutes, stirring frequently.  Once browned, add in the steamed broccoli and toss to reheat, about 2 minutes.  Lastly, add in the tarragon and toss to incorporate.  Remove the broccoli from the heat immediately and place in a serving dish, covered, until ready to serve.


As the shallot and garlic are sauteing, return the pork and any juices on the plate to the skillet and let simmer until the chops are just cooked, about 2 minutes.  Transfer the the pork chops to a serving platter.  Boil the sauce until thickened and somewhat glossy, about 2 more minutes.  Stir in the tarragon and pour the sauce over the pork chops.  Serve immediately.


All in all, the meal should take you approximately 30 minutes to prep and 30 minutes to cook.  You'll end up with about 8 servings of each. 

For plating, I used a simple square plate and neatly placed each dish on its own.  A simple presentation, leaving the varying colors contrasting nicely individually against the what backdrop.  Serve it with a glass of the red wine you have left over from the pork, it'll pair fantastically! 

Enjoy - - I know we sure did!


Tuesday, May 1, 2012

Back In The Kitchen - Just In Time For Spring!

So... I've recently been told that I should get back into my writing.  I guess there were a few of you out there who actually enjoyed my blog, and maybe even made one or two of the recipes within.  With the stress of wedding planning and additional workload in the office over the last year, hobbies seemed to have fallen by the wayside.  Well, no more!  I'm back in the kitchen and back in front of the computer!  Well, to be fair, I never really left the kitchen, I just stopped writing about my time there, but still... I'm back in front of the computer!  Let the good times roll!


This past weekend, I decided to make a very spring dinner for Shaun and myself, and what screams spring more than asparagus and peas?  So, there began a meal so spring-like, it was undeniable!  The menu was set... a delicious Asparagus Torte and a light Pasta with Asparagus, Peas, Ham and Almonds.


Asparagus Torte 

With the torte, steaming the asparagus and then tossing the pieces with shallots and butter intensifies their flavor, making them sweet and buttery.  Cracker crumbs take the place of flour in this torte and makes it just slightly custardy.  While I did not peel the asparagus, you can feel free to do so.
  •  2 pounds asparagus, tough ends trimmed, cut into 2-inch lengths
  • 4 tablespoons (1/2 stick) unsalted butter
  • 3 large shallots, minced
  • 3 green garlic stalks or scallions, thinly sliced
  • 1 teaspoon salt
  • 10 large eggs
  • 1/2 cup heavy cream
  • 1/4 cup chopped fresh basil leaves
  • 2 tablespoons minced fresh tarragon leaves
  • Pinch of cayenne pepper
  • 1 1/2 cups (6 ounces) shredded Gruyere cheese, or other semihard cheese
  • 1/2 cup crushed water crackers 

Preheat the oven to 350 degrees.  Grease a shallow 6-cup glass or ceramic casserole baking dish.

Place the asparagus in a steamer basket set over (not in) 1 inch of water in a skillet or saucepan.  Bring the water to a boil, cover and steam until the asparagus pieces are crisp-tender, about 3 minutes.  Remove the steamer basket from the pan.


In a large skillet, melt the butter over medium heat.  Add the shallots and garlic stalks and cook, stirring frequently, until the shallots are tender, about 3 minutes.  Add the asparagus, sprinkle with 1/2 teaspoon of the salt, and cook for 2 minutes.

In a large bowl, whisk together the eggs, cream, basil, tarragon, cayenne, and the remaining 1/2 teaspoon of salt.  Whisk in 1 1/4 cups of the cheese and the cracker crumbs.  Fold in the asparagus mixture.  Transfer to the casserole dish, sprinkle with the remaining 1/4 cup cheese, and bake for 25-30 minutes, or until the top is lightly browned and the center is just set.  Remove from the oven and let stand for approximately 10 minutes before slicing into 6 slices.


Pasta with Asparagus, Peas, Ham and Almonds


For the pasta dish, you can bring out more of the springtime flavors by adding fresh tarragon, which gives it a slightly lemony-anise flavor.
  •  8 ounces linguine
  • 2 teaspoon extra-virgin olive oil
  • 1 pound asparagus, tough ends trimmed, cut into 2-inch lengths
  • 1 cup half-and-half
  • 1/2 pound Virginia or Black Forest ham, in one thick slab, cut into cubes
  • 1 cup fresh or frozen (no need to thaw) peas
  • 1 tablespoon chopped fresh tarragon
  • 1 teaspoon salt
  • 1/2 teaspoon freshly ground black pepper
  • 1/4 cup grated Parmesan cheese
  • 1/3 cup slivered almonds, toasted (see below)

In a large pot of boiling salted water, cook the linguine according to the package directions.  Drain and return the pasta to the pot.

Meanwhile, in a large skillet, heat the oil over medium heat.  Add the asparagus and cook until bright green, about 2 minutes.  Add the half-and-half and bring to a boil.  Add the ham, peas, tarragon, salt and pepper and cook until the peas are crisp-tender, about 3 minutes.

Remove from the heat and add to the pasta.  Add the Parmesan and almonds and toss to combine.

 Toasting Nuts
Place nuts in a baking pan or on a rimmed baking sheet (so they won't roll off) and bake at 350 degrees until fragrant and crisp, shaking the pan once or twice, 7 to 10 minutes.  If you have only a small amount of nuts to toast and don't want to turn on the oven, place them in a small ungreased skillet and cook them over medium-low heat, tossing frequently, until crisp and fragrant.  They will toast very quickly, so be vigilant.

So, with that... you have a delicious dinner of asparagus torte and springtime pasta!  Bon Appetite! 
 

Monday, May 30, 2011

Simple Summertime Snack Time

It's happened!  The time I never thought was coming has finally arrived!  I've spent the last few weeks preparing for it, hoping and praying it would arrive soon, thinking with each passing day of monsoon that it was all for naught, but it's here!  Like a child waits for Christmas morning with eager anticipation, I waited for summertime to come, and it finally has.  On Memorial Day weekend no less! Sunny, 85 degrees and not a cloud in the sky.  Sounds like the perfect day to me for sitting on the patio with a bucket of beers and a delicious snack.

Shaun and I had the beer under control (its a rare day when there isn't at least a 12 pack of something cold in the fridge).  The snack, however, was all me.  I wanted something that wouldn't take long to prep and would be nice and cool and delicious.  I've always loved guacamole, but I wanted to make it a little more summery.  So, I made a slight twist to the avocado and tomato guacamole that most people are used to.  Instead, we're having Strawberry-Avocado Salsa with Cinnamon-Sugar Pita Chips.


Strawberry-Avocado Salsa with Cinnamon Pita Chips
(Make the chips in advance, cool completely, and store in an airtight container until ready to serve.)
  • 2 tsp. canola oil
  • 8 Pita pockets
  • 2 tsp. sugar
  • 1/2 tsp. ground cinnamon
  • 1 1/2 cups finely chopped peeled ripe avocado (about 2)
  • 1 cup finely chopped strawberries
  • 2 tbsp. minced fresh cilantro
  • 1 tsp. minced seeded jalapeno pepper
  • 2 tsp. fresh lime juice
  • 1/4 tsp. salt


Preheat the oven to 400 degrees.

To prepare the chips,brush the oil evenly over one side of each round pita chips.  Combine sugar and cinnamon ins a small bowl, sprinkle evenly over oil-coated sides of pitas.  Cut each pita into six wedges and arrange them in a single layer on a baking sheet.  Bake at 400 degrees for 10-12 minutes or until crisp.


Combine the avocado, strawberries, cilantro, jalapeno, lime juice and salt in a small bowl.  Stir gently to combine.  Serve with chips.


Now you have great little summertime snack that takes next to no time to make, especially if you make a large batch of chips ahead of time and store them for a up to a week.  This was the summer treat I was eagerly awaiting, served up perfectly on the patio with a nice cold summery beer.  I suggest you do the same!


Monday, May 23, 2011

Breakfast? Dessert? Bread So Good You Can Eat It Twice!

The other day, a loyal reader my little blog here asked me if "all I can do is cook?"  I inquired a little further as to the meaning of the question, just to decipher how insulted I should be by the question.  "Well, you only ever make 'dinner' type things... You never bake or make breakfast or dessert."  Clearly this is a friend who never sampled one of my cupcakes during my baking phase a year or two ago.

Regardless, I decided I needed to prove this friend wrong. But how?  Do I make breakfast?  I've got a great recipe for Maple Pecan Scones or Cheesecake Pancakes.  No... I'm not much of a breakfast person, myself, but I know other people are.  I have to really be in the mood for it.  Do I bake cupcakes or a cake of some sort for dessert?  Maybe.  Then it dawned on me.  Why not make a bread that could be eaten on its own with a little butter or cream cheese for breakfast, or dressed up with a scoop of vanilla ice cream and a dab of whipped cream for dessert?  It pleases everyone with a sweet tooth, no matter what time of day!  I settled on a quick and easy Apple Cranberry Bread with Lemon Glaze.


Apple Cranberry Bread with Lemon Glaze
  • 1 cup of shredded Apple, squeezed dry (about 2 large apples)
  • 1 cup dried cranberries
  • 3/4 cup rolled oats
  • 1 1/4 cups flour
  • 3/4 cup sugar
  • 1 tsp baking powder
  • 1 tsp salt
  • 1/2 tsp baking soda
  • 1/2 tsp cinnamon
  • 1/2 tsp nutmeg
  • 2 eggs
  • 1/2 cup cooled melted butter
  • 1/2 cup sour cream
  • 1 tsp vanilla extract
  • 1 tsp lemon zest (optional)
  • 1 cup confectioners' sugar
  • 1 tbsp milk
  • 1 tbsp lemon juice or orange juice
  • 1 tsp lemon or orange zest

Preheat the oven to 350 degrees.  Lightly butter a 9x5 inch loaf pan.  (Personally, I love my silicone bakeware, but the shape does always end up a little more flat and wide than tall with them, so if you prefer a traditional loaf shape, stick with glass.)  

Mix the flour, sugar, baking powder, salt, baking soda, cinnamon and nutmeg in a large bowl until well combined.  Add in the rolled oats and dried cranberries and mix well.

In a small bowl, whisk together the eggs, melted cooled butter, sour cream, vanilla extract and option lemon zest.  Stir in the grated apple which has been squeezed dry into the egg mixture.  It's ok if this starts to brown a little, but don't grate the apple too far in advance or you will have brown apples.  Fold the egg mixture into the dry mixture until just combined.

Spread the batter in the prepared pan.  Bake until a toothpick inserted into the center comes out clean, about 55 minutes.  Remove from the oven and cool in the pan on a wire cooling rack for 30 minutes.  Then, turn the bread out onto the rack to cool completely.

Once the bread has cooled completely, prepare you glaze by whisking together in a medium bowl the confectioners' sugar, milk, lemon or orange juice and lemon or orange zest.  Place the wire rack with the bread on it on a baking sheet or wax paper and pour the glaze over the top, making sure to cover the top of the bread, letting the excess drip down the sides.  Let the glaze set for 20-25 minutes, or until firm.

For serving, I placed the bread on a small white platter, cut the first 1/4 of the bread into thin (1/2 inch) slices and leaned them up against the remainder of the bread, then sprinkled the plate with some extra dried cranberries.  This is an ideal serving method for breakfast, allowing people to take a slice and place their own spread of butter, cream cheese marmalade or jam on top.

For a dessert plating, which is what I served this bread as at home, I placed a scoop of vanilla ice cream in a shallow soup bowl, leaned a thicker (3/4 - 1 inch) slice against the scoop of ice cream and then put a dollop of whipped cream in the center on top of the bread and ice cream.  I then sprinkled a few dried cranberries on top and around the edge of the bowl for garnish.

All-in-all, this is a simple breakfast or dessert to make a day ahead of time and then you have it on hand for the next few days, as it keeps well.  After Shaun and I sampled for dessert, I brought the remainder into work the following morning to share with coworkers for breakfast.  Needless to say, my friend had a piece and hasn't asked me if I can do anything other than cook since.  Happy baking!

Tuesday, May 17, 2011

Asian Pork With Noodles Soup - Just Another Reason to Use Chopsticks!


Sundays are usually errand and cleaning day around my condo, so by the time dinner becomes a thought for Shaun and I, most people have already eaten, cleaned up and are well onto dessert or a nice Sunday evening movie on the couch.  No, not in my house.  While most people I know enjoy a relatively early family meal around 4 or 5pm, we're usually just getting home from the mall or the market. 

A few Sunday's ago, I was determined to make a conscious effort to change this.  Don't get me wrong, we still had a bunch of errands to run, a storage area to clean out and a condo to clean, but things were going to be different that day.  I decided early on to do a slow-cooker dinner so I wouldn't have to tend to it all that much.  I was so confident this would work out right, that I told Shaun he could even invite our friend Matt over for dinner... a rarity on a Sunday. 

That all being said, I am normally not a fan of slow-cookers.  The only thing I find them useful for is soups and stews, as most other things always come out tasting the same to me.  So, a soup it was going to be.  I had long been eying a new recipe for an Asian slow-cooker soup and decided this was the day to try it.  I made a plan Saturday evening to get up, go to the market on Sunday morning around 9am, get everything I needed, come home, get it going so it could cook for 8 hours and do all my chores as the soup simmered away. 

Well, 11am rolled around and I was just leaving for the market.  After getting a great piece of fresh pork butt cut for me by my awesome butcher at Dave's, I was ready to get home and get cracking on my Slow-Cooker Asian Pork with Noodle Soup.


Slow-Cooker Asian Pork with Noodles Soup
  • 3 cups low-sodium chicken broth
  • 1/4 cup soy sauce
  • 1/4 cup Chinese rice wine or dry cooking sherry
  • 3 tbsp packed light brown sugar
  • 4 cloves garlic, smashed
  • 1 2-inch piece of ginger, peeled and sliced
  • 2 pieces star anise (admittedly, this can be hard to find outside of an Asian market.  Substitute 1 tsp. Chinese 5-Spice powder in, which can be found in the spice section of most markets)
  • Salt
  • 3 pounds boneless pork shoulder or pork butt
  • 1 head bok choy, roughly chopped
  • 4 oz dried rice noodles
  • 1/3 cup fresh cilantro, chopped


Combine the chicken broth, soy sauce, rice wine, brown sugar, garlic, ginger, star anise or Chinese 5-Spice and 1/2 tsp salt in a 5-6 quart slow cooker and stir to combine.  Add the pork, then cover and cook on low for 8 hours.


After 8 hours, add the bok choy to the slow cooker; cover and cook about 20 more minutes.


Add the rice noodles to the slow cooker, making sure they are completely submerged.  Cover and cook 10 more minutes.


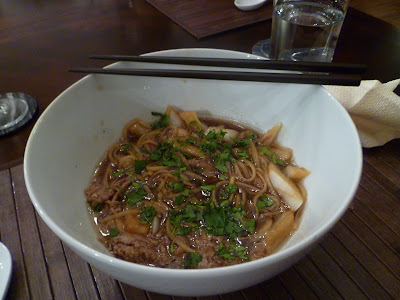
Remove the pork from the slow cooker using 2 large spoons or spatulas, as the meat will be very tender and will fall apart at even the most gentle touch.  Place the meat on a large cutting board or plate and shred.  Divide the shredded pork and bok choy amongst 4 bowls and ladle the broth evenly into the bowls.  Sprinkle with the cilantro.

S
erve this soup in an oversize large bowl big enough to hold a hearty helping of the pork and a ladle or two of the savory broth.


So there you have it.  Even if we didn't eat early like I planned, we ate good!  The soup was a hit with Shaun and our friend Matt who graciously volunteered to come over for dinner anytime we would have him.  There's always next Sunday for another attempt at eating before 10pm.  For now, I'll just say we prefer the European dinner schedule!