Monday, May 30, 2011

Simple Summertime Snack Time

It's happened!  The time I never thought was coming has finally arrived!  I've spent the last few weeks preparing for it, hoping and praying it would arrive soon, thinking with each passing day of monsoon that it was all for naught, but it's here!  Like a child waits for Christmas morning with eager anticipation, I waited for summertime to come, and it finally has.  On Memorial Day weekend no less! Sunny, 85 degrees and not a cloud in the sky.  Sounds like the perfect day to me for sitting on the patio with a bucket of beers and a delicious snack.

Shaun and I had the beer under control (its a rare day when there isn't at least a 12 pack of something cold in the fridge).  The snack, however, was all me.  I wanted something that wouldn't take long to prep and would be nice and cool and delicious.  I've always loved guacamole, but I wanted to make it a little more summery.  So, I made a slight twist to the avocado and tomato guacamole that most people are used to.  Instead, we're having Strawberry-Avocado Salsa with Cinnamon-Sugar Pita Chips.


Strawberry-Avocado Salsa with Cinnamon Pita Chips
(Make the chips in advance, cool completely, and store in an airtight container until ready to serve.)
  • 2 tsp. canola oil
  • 8 Pita pockets
  • 2 tsp. sugar
  • 1/2 tsp. ground cinnamon
  • 1 1/2 cups finely chopped peeled ripe avocado (about 2)
  • 1 cup finely chopped strawberries
  • 2 tbsp. minced fresh cilantro
  • 1 tsp. minced seeded jalapeno pepper
  • 2 tsp. fresh lime juice
  • 1/4 tsp. salt


Preheat the oven to 400 degrees.

To prepare the chips,brush the oil evenly over one side of each round pita chips.  Combine sugar and cinnamon ins a small bowl, sprinkle evenly over oil-coated sides of pitas.  Cut each pita into six wedges and arrange them in a single layer on a baking sheet.  Bake at 400 degrees for 10-12 minutes or until crisp.


Combine the avocado, strawberries, cilantro, jalapeno, lime juice and salt in a small bowl.  Stir gently to combine.  Serve with chips.


Now you have great little summertime snack that takes next to no time to make, especially if you make a large batch of chips ahead of time and store them for a up to a week.  This was the summer treat I was eagerly awaiting, served up perfectly on the patio with a nice cold summery beer.  I suggest you do the same!


Monday, May 23, 2011

Breakfast? Dessert? Bread So Good You Can Eat It Twice!

The other day, a loyal reader my little blog here asked me if "all I can do is cook?"  I inquired a little further as to the meaning of the question, just to decipher how insulted I should be by the question.  "Well, you only ever make 'dinner' type things... You never bake or make breakfast or dessert."  Clearly this is a friend who never sampled one of my cupcakes during my baking phase a year or two ago.

Regardless, I decided I needed to prove this friend wrong. But how?  Do I make breakfast?  I've got a great recipe for Maple Pecan Scones or Cheesecake Pancakes.  No... I'm not much of a breakfast person, myself, but I know other people are.  I have to really be in the mood for it.  Do I bake cupcakes or a cake of some sort for dessert?  Maybe.  Then it dawned on me.  Why not make a bread that could be eaten on its own with a little butter or cream cheese for breakfast, or dressed up with a scoop of vanilla ice cream and a dab of whipped cream for dessert?  It pleases everyone with a sweet tooth, no matter what time of day!  I settled on a quick and easy Apple Cranberry Bread with Lemon Glaze.


Apple Cranberry Bread with Lemon Glaze
  • 1 cup of shredded Apple, squeezed dry (about 2 large apples)
  • 1 cup dried cranberries
  • 3/4 cup rolled oats
  • 1 1/4 cups flour
  • 3/4 cup sugar
  • 1 tsp baking powder
  • 1 tsp salt
  • 1/2 tsp baking soda
  • 1/2 tsp cinnamon
  • 1/2 tsp nutmeg
  • 2 eggs
  • 1/2 cup cooled melted butter
  • 1/2 cup sour cream
  • 1 tsp vanilla extract
  • 1 tsp lemon zest (optional)
  • 1 cup confectioners' sugar
  • 1 tbsp milk
  • 1 tbsp lemon juice or orange juice
  • 1 tsp lemon or orange zest

Preheat the oven to 350 degrees.  Lightly butter a 9x5 inch loaf pan.  (Personally, I love my silicone bakeware, but the shape does always end up a little more flat and wide than tall with them, so if you prefer a traditional loaf shape, stick with glass.)  

Mix the flour, sugar, baking powder, salt, baking soda, cinnamon and nutmeg in a large bowl until well combined.  Add in the rolled oats and dried cranberries and mix well.

In a small bowl, whisk together the eggs, melted cooled butter, sour cream, vanilla extract and option lemon zest.  Stir in the grated apple which has been squeezed dry into the egg mixture.  It's ok if this starts to brown a little, but don't grate the apple too far in advance or you will have brown apples.  Fold the egg mixture into the dry mixture until just combined.

Spread the batter in the prepared pan.  Bake until a toothpick inserted into the center comes out clean, about 55 minutes.  Remove from the oven and cool in the pan on a wire cooling rack for 30 minutes.  Then, turn the bread out onto the rack to cool completely.

Once the bread has cooled completely, prepare you glaze by whisking together in a medium bowl the confectioners' sugar, milk, lemon or orange juice and lemon or orange zest.  Place the wire rack with the bread on it on a baking sheet or wax paper and pour the glaze over the top, making sure to cover the top of the bread, letting the excess drip down the sides.  Let the glaze set for 20-25 minutes, or until firm.

For serving, I placed the bread on a small white platter, cut the first 1/4 of the bread into thin (1/2 inch) slices and leaned them up against the remainder of the bread, then sprinkled the plate with some extra dried cranberries.  This is an ideal serving method for breakfast, allowing people to take a slice and place their own spread of butter, cream cheese marmalade or jam on top.

For a dessert plating, which is what I served this bread as at home, I placed a scoop of vanilla ice cream in a shallow soup bowl, leaned a thicker (3/4 - 1 inch) slice against the scoop of ice cream and then put a dollop of whipped cream in the center on top of the bread and ice cream.  I then sprinkled a few dried cranberries on top and around the edge of the bowl for garnish.

All-in-all, this is a simple breakfast or dessert to make a day ahead of time and then you have it on hand for the next few days, as it keeps well.  After Shaun and I sampled for dessert, I brought the remainder into work the following morning to share with coworkers for breakfast.  Needless to say, my friend had a piece and hasn't asked me if I can do anything other than cook since.  Happy baking!

Tuesday, May 17, 2011

Asian Pork With Noodles Soup - Just Another Reason to Use Chopsticks!


Sundays are usually errand and cleaning day around my condo, so by the time dinner becomes a thought for Shaun and I, most people have already eaten, cleaned up and are well onto dessert or a nice Sunday evening movie on the couch.  No, not in my house.  While most people I know enjoy a relatively early family meal around 4 or 5pm, we're usually just getting home from the mall or the market. 

A few Sunday's ago, I was determined to make a conscious effort to change this.  Don't get me wrong, we still had a bunch of errands to run, a storage area to clean out and a condo to clean, but things were going to be different that day.  I decided early on to do a slow-cooker dinner so I wouldn't have to tend to it all that much.  I was so confident this would work out right, that I told Shaun he could even invite our friend Matt over for dinner... a rarity on a Sunday. 

That all being said, I am normally not a fan of slow-cookers.  The only thing I find them useful for is soups and stews, as most other things always come out tasting the same to me.  So, a soup it was going to be.  I had long been eying a new recipe for an Asian slow-cooker soup and decided this was the day to try it.  I made a plan Saturday evening to get up, go to the market on Sunday morning around 9am, get everything I needed, come home, get it going so it could cook for 8 hours and do all my chores as the soup simmered away. 

Well, 11am rolled around and I was just leaving for the market.  After getting a great piece of fresh pork butt cut for me by my awesome butcher at Dave's, I was ready to get home and get cracking on my Slow-Cooker Asian Pork with Noodle Soup.


Slow-Cooker Asian Pork with Noodles Soup
  • 3 cups low-sodium chicken broth
  • 1/4 cup soy sauce
  • 1/4 cup Chinese rice wine or dry cooking sherry
  • 3 tbsp packed light brown sugar
  • 4 cloves garlic, smashed
  • 1 2-inch piece of ginger, peeled and sliced
  • 2 pieces star anise (admittedly, this can be hard to find outside of an Asian market.  Substitute 1 tsp. Chinese 5-Spice powder in, which can be found in the spice section of most markets)
  • Salt
  • 3 pounds boneless pork shoulder or pork butt
  • 1 head bok choy, roughly chopped
  • 4 oz dried rice noodles
  • 1/3 cup fresh cilantro, chopped


Combine the chicken broth, soy sauce, rice wine, brown sugar, garlic, ginger, star anise or Chinese 5-Spice and 1/2 tsp salt in a 5-6 quart slow cooker and stir to combine.  Add the pork, then cover and cook on low for 8 hours.


After 8 hours, add the bok choy to the slow cooker; cover and cook about 20 more minutes.


Add the rice noodles to the slow cooker, making sure they are completely submerged.  Cover and cook 10 more minutes.


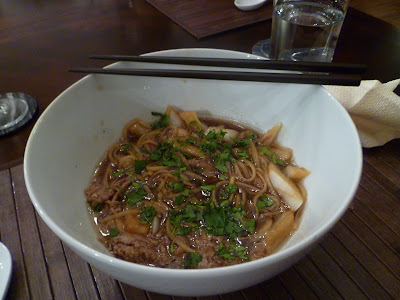
Remove the pork from the slow cooker using 2 large spoons or spatulas, as the meat will be very tender and will fall apart at even the most gentle touch.  Place the meat on a large cutting board or plate and shred.  Divide the shredded pork and bok choy amongst 4 bowls and ladle the broth evenly into the bowls.  Sprinkle with the cilantro.

S
erve this soup in an oversize large bowl big enough to hold a hearty helping of the pork and a ladle or two of the savory broth.


So there you have it.  Even if we didn't eat early like I planned, we ate good!  The soup was a hit with Shaun and our friend Matt who graciously volunteered to come over for dinner anytime we would have him.  There's always next Sunday for another attempt at eating before 10pm.  For now, I'll just say we prefer the European dinner schedule! 

Saturday, May 14, 2011

Baked Pasta Pleases Everyone

This past weekend, Shaun invited a friend of ours over for dinner and volunteered me to cook, as he so often has recently.  I think he's finally realizing that those who were once his friends are now coming over for my cooking and less for his company.  That being the case, I of course snatched the phone away from him when he was making these plans to do a little reconnaissance work on what our guest wanted for dinner.  Being met with a response of "I don't know... anything," followed immediately by a list of items that were off limits (all of which were things you would never find being made in my kitchen anyways), I offered up some things.  I had already made steak the last time she was over for dinner, so I ruled out red meat.  "Chicken of some sort?  Pork?  Perhaps a particular fish?  Pasta?"  "Ooooh... oooh.  Pasta.  Yes. Pasta!"  Done.  We hung up and I had a dinner plan.  Or did I?

There are so many things one can do with pasta.  Small pasta, large pasta, stuffed pasta, baked pasta.  Red sauce, cream sauce, wine sauce, cheese sauce.  After ending my internal monologue of sounding like an Italian chef's personal Dr. Seuss book, I settled on doing more than just heating sauce and perhaps a meat or veggie to toss into a plain old marinara sauce.  Thus, I decided to a slightly more enriched pasta bake filled with ooey-gooey cheese and meat and veggies with a homemade creamy tomato sauce.  I couldn't just put baked pasta on the table though, so I decided to do a little roasted tomato appetizer and some garlic bread.  I was looking for a reason to try Ina Garten's pesto recipe, and it just fit so perfectly here.  So there we had it.  A nice dinner of Tomatoes Roasted with Pesto and Baked Pasta with Sausage, Eggplant, Fennel and Spinach with Tomato Cream Sauce.


Tomatoes Roasted With Pesto
  • 2-2 1/2 pounds large red tomatoes
  • 3 tbsp. good olive oil
  • 2 tsp. dried oregano
  • Pinch of Salt
  • 1/2 tsp ground black pepper
  • 1/2 cup pesto, store bought or homemade (see Ina Garten's recipe below)
  • 1/2 cup freshly grated Parmesan

Homemade Pesto Sauce
  • 1/4 cup walnuts
  • 1/4 cup pine nuts
  • 3 tbsp. diced garlic (about 9 cloves)
  • 5 cups fresh basil leaves, packed
  • 1 tsp salt
  • 1 tsp ground black pepper
  • 1 1/2 cups good olive oil
  • 1 cup freshly grated Parmesan cheese

Baked Pasta and Homemade Sauce
  • 1 lb of Large Shells
  • 4 tbsp olive oil, divided
  • 4 cloves of garlic, sliced
  • Pinch of Red Pepper flakes
  • 28 oz. can of plum tomatoes
  • 15 oz. can diced tomatoes
  • 1 cup water
  • 4 sprigs basil
  • 1 cup hot Italian Sausage, cooked and crumbled
  • 1 cup eggplant, cut into 1/2 inch cubes and sauteed until soft
  • 1 cup fennel, thinly sliced and sauteed
  • 1 cup fresh ricotta
  • 3 cups fresh mozzarella, cubed
  • 1 cup grated Pecorino cheese, grated

First, preheat the oven to 450 degrees.  Bring a large pot of salted water to a boil; cook the shells until very al dente, about 2-3 minutes less than the label directs; drain.


For the tomatoes, core them and then slice them across (not through the stem) in 1/2 inch-thick slices.  Arrange the slices in a single layer on a sheet pan.  Drizzle the tomatoes with the 3 tbsp of good olive oil and sprinkle with the oregano, 1 1/2 tsp of salt and pepper. (Oregano is one of the few herbs where I prefer to use dried over fresh, as the flavor is actually better).  Set aside until ready for baking when the pasta is resting.


To begin the sauce, heat 2 tbsp olive oil in a large skillet over medium heat.  Add the 4 sliced cloves of garlic and a pinch of red pepper flakes and cook until the garlic is golden.  Add the 28 oz. can of plum tomatoes to the skillet and crush them.  Once crushed, add the diced tomatoes.  Rinse each can out with 1/2 cup water and add the skillet.  Add 4 large basil sprigs; simmer, uncovered, until the sauce is thickened, about 20 minutes.  Discard the basil; season with salt.  (Alternatively, if you're short on time, you could use 4 cups of prepared tomato sauce).


While the sauce is simmering, cook the hot Italian sausage, eggplant and fennel in the other 2 tbsp of olive oil.  Stir in the 1 cup ricotta cheese into your sauce, then add your cooked sausage, eggplant and fennel.  


Toss the cooked pasta with the sauce and 1 1/2 cups of the mozzarella and 1/2 cup of the Pecorino cheese.  Spread into an oiled 3-4 quart baking dish.  Sprinkle the remaining mozzarella and Pecorino over the top.  Bake, uncovered, until browned, about 15 minutes.  Let rest 15-20 minutes before serving.

While the baked pasta is resting, bake the tomatoes for 10 minutes.  Remove them from the oven, spread each slice with pesto, and sprinkle with the Parmesan.  Return the tomatoes to the oven and continue baking for 7 to 10 minutes, until the Parmesan is melted and begins to brown.  Remove from oven and sprinkle with extra salt to taste.


For plating, I served the tomatoes first on a small salad plate, although in hindsight, I probably would have served the tomatoes with the pasta and garlic bread.  Regardless, place a decent sized scoop of the pasta bake in the corner of the plate and lean a piece of the garlic toast against it, and sprinkle some fresh shredded parsley for garnish.  Enjoy!


Tuesday, April 26, 2011

Zesty Burgers and Sweet Potato Fries

First of all, let me apologize for my lack of an update over the last week and a half.  To say life is busy is an understatement.  However, that doesn't mean I haven't partaken in my favorite relaxing past time: cooking!  With that, lets time travel back to Friday night of 2 weekends ago.  Weekends are for fun, right?  I know I personally view them as my escape from the day-to-day grind of work.  However, this week was a doozy and really wore me out, so the last thing I was looking to do was go out.  I wanted to stay in and relax, but that doesn't mean I couldn't still have a little fun with my cooking.

Now, Mother Nature still wasn't quite realizing that it was mid-April, meaning spring, leaving it a balmy 45 degrees outside with a breeze and some rain.  So, my idea of going home after work and firing up the grill for dinner turned in to a plan of staying in and firing up the grill pan on the stove for dinner.  No matter - they have the same end result.  So, I called Shaun and provided him with a list of ingredients needed to make dinner that evening that I expected to find on the counter for me when I got home and let him know we would be having some Zesty Poblano Pepper Bison Burgers With Chipotle Sauce and Sweet Potato Fries with Dipping Sauce.


 Zesty Pablano Pepper Bison Burgers
  • 2 pablano peppers
  • 1/2 medium red onion
  • 1 cup loosely packed fresh cilantro
  • 4 1/2 hamburger buns
  • 2 cloves of garlic, pressed
  • 1 tsp ground cumin
  • 1/2 tsp black pepper
  • 1/4 tsp salt
  • 1 lb bison meat
  • 4 slices pepper-jack cheese

Chipotle Sauce
  • 2tbsp light mayonnaise
  • 1 tsp lime juice
  • 1/2 tsp adobo seasoning

Sweet Potato Fries
  • 1 1/4 lbs sweet potato
  • 1 tsp salt, plus more to taste to taste
  • 1/2 tsp sugar
  • cold water
  • 4 tsp vegetable oil
  • 1 tsp paprika
  • 1/4 tsp chili powder

French Fry Dipping Sauce
  • 2 tbsp light mayonnaise
  • 2 tbsp ketchup
  • 1/4 tsp onion powder
  • 1/4 tsp garlic powder


First, preheat your broiler to high for the poblano peppers.  While preheating, make your chipotle sauce by combining the mayonnaise, lime juice and adobo seasoning in a small bowl and mixing well.  Cover and place in the refrigerator until ready to serve.

Next, prepare your french fry dipping sauce by combining the mayonnaise, ketchup, onion powder and garlic powder in another small bowl and mixing well.  Cover and place in the refrigerator until ready to serve.

To begin the french fries at this point, you should peel your sweet potato and cut it into 1/4 inch wide strips, 3-4 inches long each, such that they resemble french fries.  Place the strips in a large bowl and add cold water until the french fries are just covered.  Add the sugar and 1 tsp salt and stir.  Let the french fries soak for 15 minutes.  Soaking the potatoes in a salt-sugar solution will draw out some of their natural water, so they brown, rather than steam, in the oven.


For the burgers, place the poblano peppers on a small sheet pan.  Place the sheet pan 2-4 inches from the heating element in the oven and broil for 8 minutes, turning the peppers after 6 minutes.  Once done, remove the peppers from the oven, lower the temperature of the oven to 450 degrees, and place the peppers in a large, resealable plastic bag for 15 minutes.  This will help you to skin the peppers later on and also help them continue to cook and soften without being in the oven. 

While the peppers are resting, drain your french fries and place them on some dry cloths and blot them dry.  The fries will need to be completely dry or they will not crisp in the oven.  You'll end up with really soggy fries.  Once complete dry, place them in a clean dry bowl and add the oil, paprika and chili powder.  Toss to coat completely.  Once they fries are completely coated, spread them out on a lightly greased baking sheet, making sure none of the fries are overlapping.  Sprinkle the fries with salt to taste and place in the oven.  Bake, turning occasionally as they brown, until cooked through and crisp, about 35-40 minutes. 

Meanwhile, preheat your grill pan and grill press over medium-high heat for 5-7 minutes.  While pan and press are heating and the fries are baking, remove the poblano peppers from the resealable bag.  At this point, the skins of the peppers should be blistering and separating from the peppers.  Remove all of the skin from the peppers and then seed them. Finely chop the poblanos, red onion and cilantro.  Place in a large bowl.  Tear up the additionally half of a hamburger bun that you have into very small pieces and add to the bowl.  Now add in your pressed garlic, cumin, pepper and salt and mix everything together until a smooth paste forms.  Add your bison meat and mix gently until just incorporated.  Now form your bison meat mixture into for 3/4 inch thick patties.

Place the patties in your grill pan and top with your grill press.  Cook 3-4 minutes on each side, until grill marks begin to appear.  For the final minute on the second side, add a slice of pepper-jack cheese to the top of each burger and allow to melt a bit.  Transfer the burgers to a paper towel-lined plate and let rest for 5 minutes to absorb the grease.


For plating this this meal, I used a large square plate, putting a small dish with the french fry dipping sauce in one corner and a second small dish with some of the chipotle sauce and a small spoon in the diagonal corner.  I then place some french fries in the top corner not yet occupied and lastly added the burger sitting on the bottom bun in the last corner.  In my house, burgers are always topped with lettuce, tomato and red onion, so those got rested on the burger with the top half of the bun just leaning on the fries and burger.  Serving the chipotle sauce on the side with a spoon allows each person to decide how much of the sauce they want to spread on the top of half of the bun.

Now, grab a cold beer, kick your feet up and enjoy a nice spring/summer night on the patio or deck with your relatively simple and healthy dinner!


Monday, April 18, 2011

Simple Tuna Salad - Kicked Up a Notch

As usually happens at some point in my afternoon while at work, Shaun called me this past Thursday to ask the question he so often asks: "What's for dinner tonight?"  He unfortunately was met with a barrage of insults and suggestions as to what he could eat, none of which actually being anything appetizing or, in some cases, even edible.  Needless to say, I was tired and cranky and was NOT in any mood to come home and cook him dinner.

Now, I'm not saying I want him to cook for me (I've had his cooking...), but I was in one of those moods where it would have been nice if it wasn't just expected that I was going to make dinner every night.  To be fair, he doesn't expect it, and I have said that cooking relaxes me and that I do enjoy it, but still - he should know me well enough to know when I'm tired and cranky to not ask me to do anything.


That being said, we did need to eat, and we had just talked about how we need to stop spending so much money on eating out.  To try and make me feel less obligated to put something more than simple on the table, he said he didn't care if we just had tuna fish sandwiches for dinner.

Well, this is me, and if there is one thing I don't like to be simple or plain, it is my food.  However, tuna fish was an easy thing to do, and even easier to jazz up beyond your basic tuna sandwich or tuna melt.  My brain got to thinking and soon our "plain old tuna sandwiches" were Tuna Manicotti with Tomato-Caper Relish and Creamy Scallions.


Tuna Cannelloni
  • 6 uncooked manicotti pasta shells
  • 1 lemon
  • 2 - 5oz cans low-sodium solid white albacore tuna in water, drained
  • 1/2 cup light mayonnaise
  • 2 tbsp parsley, chopped
  • 1/2 small red onion, finely chopped
  • 1 tbsp capers 
  • 1/2 tsp coarsely ground black pepper

Tomato-Caper Relish
  • 2 tbsp capers, drained
  • 2 tbsp parsley, chopped
  • 1/2 tsp coarsely ground black pepper
  • 1 tbsp lemon juice
  • 3 medium vine-ripened tomatoes, finely diced

Creamy Scallions
  • 4 bunches of scallions, trimmed
  • 1/4 cup water
  • 1/2 heavy cream
  • 2 cloves of garlic, finely chopped
  • Salt and Pepper (to taste)

Cook the pasta shells according to the package directions, plus an additional 1-2 minutes, making sure to NOT put any salt or oil in the water. (I know it is common to add one or the other to pasta water to enhance flavor and prevent sticking, but it will affect the taste of the tuna in this case.  Besides, you should NEVER add oil to your pasta water if you ever want a nice hearty marinara to stick to it!  Any good Italian knows that!) Gently transfer the pasta to a colander, making sure not to break any of the shells.  Rinse with cold water and set aside.

Trimming Scallions
Meanwhile, while the pasta is cooking, trim the bottom of the white ends of your scallions off and place the 4 bunches in a small sauce pan with the water.  Bring to a simmer and them cook, covered, for 5-7 minutes.  Add the heavy cream and the garlic to the pot and continue to simmer until the liquid is reduced by half and the cream begins to thicken, about 6-7 minutes.  Season with salt and pepper to taste.


Zest of a Lemon

 Once you have your pasta cooked and set aside and your scallions started, begin on the tuna filling.  Zest the lemon until you have about 1 tbsp of zest.  Then juice the lemon until you have 1 tbsp of lemon juice, which you should set aside for the relish.  In a small bowl, combine your lemon zest, tuna, mayonnaise, 2 tbsp parsley, onion, 1 tbsp capers and black pepper and mix well.  


Resealable Bag as Pastry Bag

Spoon this filling into a small pastry bag (alternatively, if you do not have a pastry bag, as most people don't, use a resealable plastic bag, trying to get it all in one corner of the bag).  Set aside.


Now, at this point, I have to take a break to share with you a short, but amusing scenario that unfolded.  I got to this step of the recipe and went to get my capers out of the refrigerator, but alas... NO CAPERS!  After asking Shaun to ever so kindly go to the ghetto Stop & Shop up the street and grab a jar for me (read: yelling at him and demanding he do so if he wanted to eat that night) and being met with a reply of, "The chances of me doing that for you right now are slim-to-none," I went myself.  Now, this isn't your usual grocery store... things aren't where you would think they would be.  So, being safe, I asked who I was hoping would be a knowledgeable and helpful employee when I arrived where to find the capers.  The response I got back was, "Oh... umm... I'm not really sure what those are.  Are they like a mushroom or something?"  "No... not quite."  After going on a scavenger hunt through the produce section with the young man I've come to refer to as "Crater-face the know-nothing" after my several encounters with him in this store over the last year and NOT finding the capers, as I assumed we wouldn't since they really aren't a mushroom at all (which I very politely explained to him), he said, "I'm sorry, I can't really help you.  Maybe you should try another store."  Needless to say, I went and found them in the Italian food section of the store on my own.  That will teach me to ask for assistance again!  I'll stick with Whole Foods and Dave's Market for the majority of my grocery shopping needs, thank you very much!  If anyone asks why, I'll simply tell them Crater Face told me to.

For the relish, begin by coring and seeding your tomatoes (see image for what they should look like.)  Finely dice the tomatoes and combine them with the lemon juice previously set aside, 2 tbsp parsley, 2 tbsp capers and black pepper and mix well.

Now, to assemble the manicotti, trim the corner of the bag containing your tuna filling or grab your pastry bag and pipe the tuna into each end of your manicotti shells until it is just sticking out the end of each shell.

To plate this simple dish and make it look a lot more elegant than it actually is, put a small spoonful or 1 grab of tongs worth of creamed scallions down in the middle of the plate.  Lay one manicotti horizontally across the scallions, then lay a second perpendicular to the first, resting the end of the second in the center of the first.  Top with the relish, making sure to scatter a bit of extra relish around the plate for garnish.

See!  It doesn't take much to turn that plain old tuna sandwich into something you'd find on the menu at a local tapas bar.  Go ahead, amaze your friends or family with this simple culinary wonder.  You don't have to tell them it only took you 20 minutes!


Saturday, April 16, 2011

A Friday... No, Saturday... Scratch That... Sunday Evening Feast

Last Wednesday I went to the market after work, as I so often do, to get the necessary items to make dinner that evening.  As I perused the aisles for my necessary ingredients for my dinner that night, I happened to notice that oven roaster chickens were massively on sale.  Well, not being one to pass up a bargain, I grabbed one.  "This will be a nice dinner on Friday night.  Come home, season it up quick and toss it in the oven for a late dinner," I thought to myself.

Well, that didn't go as planned.  Quick drinks after work on Friday for a friend's birthday turned into several hours at the bar and me hitting the McD's drive-thru up the street from the casa before walking through the front door at about 11.  I certainly wasn't cooking a chicken then.  So, Saturday it was.. but wait!  Friends from Boston were going to be in the Providence area that day and wanted to go to dinner.  How could I say no?  I'd have offered to cook the old bird for them, but alas, she was only big enough to feed 3, at best.

Sunday it was.  The damn bird has been in my fridge since Wednesday, and it was too late to freeze it, and I knew I wouldn't be home on Monday or Tuesday night, so, left with no options other than cooking it or chucking it, I made a chicken.  Sometimes, the best dinners are the ones you didn't want to or plan on making.

So, I had a chicken, but what to do with it?  And better yet, what to serve with it?  It had already been a very long weekend, so going to the grocery just wasn't going to happen.  This is where I get my culinary creativity flowing.  Opening the fridge and the cabinets, assessing what I have at my disposal, I settled on a Lemon Pepper Roast Chicken with Carrots and Celery in Dill Butter and a Lemon Carrot Couscous.


Lemon Pepper Chicken
  • 4lb Oven Roaster Chicken
  • 4 tbsp olive oil, divided
  • 1 lemon, halved
  • 2 tbsp Lemon Pepper Rub, divided
  • Salt and Pepper 
  • 2 sprigs of Rosemary
  • 2 sprigs of Thyme
  • 6 cloves of garlic, peeled

Carrots and Celery with Almonds in Dill Butter 
  • 3 cups sliced carrots
  • 1/2 cups water
  • 1/2 tsp salt
  • 1 cup sliced celery
  • 1/2 cup slivered almonds
  • 1/2 tsp dill weed
  • 3 tbsp butter, divided

Lemon Carrot Couscous
  • 1 cup uncooked couscous
  • 1 cup water
  • 3 tbsp olive oil, divided
  • 1 lemon
  • 5 cloves of garlic, minced
  • 2 large carrots, shredded
  • 1 tbsp butter

To get started, preheat your oven to 400 degrees.  Next, clean out the inside of chicken and rinse the inside cavity out with cold water.  Pat the chicken dry and place it in a roasting pan or deep covered stoneware baker, which will reduce the cooking time and keep the chicken more moist.  Loosen the skin from the breast and thigh portion of the chicken using a spoon or dull butter knife.


Now, prepare your chicken seasoning.  In a small bowl, put 2 tbsp of olive oil, the juice from 1 half of your lemon, the zest of 1 half of your lemon, a tbsp of Lemon Pepper rub and a pinch of salt and pepper.  Combine all of the ingredients.  In a separate small bowl, combine the remaining olive oil, juice and zest of the remaining half of the lemon, another tbsp of the Lemon Pepper rub and another pinch of salt and pepper.  Take of of the bowls and pour the mixture under the skin of the chicken, massaging the skin to spread the seasoning mix all over the breasts and thighs of the chicken.  Next, brush the second bowl of mix all over the skin of the chicken for crisping.  Now, place the two lemon haves from before, the thyme, the rosemary and the garlic cloves into the cavity of the chicken.

Roast the chicken, covered, 65-70 minutes or until a meat thermometer registers at 140 degrees in the center of the thickest part of the breast.  Uncover and roast an additional 8-10 minutes or until the thermometer registers 165 degrees, the juices run clear and the chicken skin in browned.  Remove the roasting pan or stoneware baker from the oven; let stand, covered, 10 minutes.  Remove the lemon, thyme, rosemary and garlic from the chicken, carve and serve.

While the chicken is in the oven, get your carrots and celery sliced.  In a small saucepan, bring the carrots and the water with the salt to a boil.  Once boiling, reduce the heat, cover and simmer for 10 minutes.  Add in the celery and cook an additional 5 minutes, or until tender.  Drain the vegetables and put back in the pot and cover to keep warm.

Meanwhile, in a small skillet, melt 2 tbsp of butter over medium low heat.  Add in the dill weed and almonds and saute for about 8 minutes, until golden brown.  Add to the carrot mixture and throw in the last tbsp of butter.  Stir to coat the carrots and celery and leave covered on the burner on the lowest setting, or a keep warm setting if you have one.

For the couscous,  saute the shredded carrot, zest of 1 lemon and garlic in 1 tbsp of olive oil until soft, about 5 minutes.  While sauteing, bring the water, 2 tbsp olive oil, juice of half of the lemon and a pinch of salt and pepper to a boil in a small saucepan.  Once boiling, remove from heat, stir in the couscous and the carrots and garlic.  Cover and let the couscous absorb the liquid for about 5 minutes.  Fluff with a fork before serving.

For plating this dish, I used a large high sided bowl.  First, lay a large spoonful of the couscous in the bottom.  Next, put a spoonful or two of the carrots and celery on top of the couscous in a line down the middle.  Lastly, place one of the whole chicken breasts just behind the line of vegetables, and place a wing and leg on either side.

Now, here comes the confession of the day.  I wasn't overly fond of the couscous on its own.  Don't get me wrong, it was good, but it was a bit bland for me.  That being said, Shaun and I both found that if you take a forkful of the couscous with the carrots and celery, they went GREAT together.  So much so, I may combine them into one dish the next time...


Until then, though... happy eating!


Monday, April 11, 2011

Manly Men Love Meat and Potatoes

Anyone who knows me will say that I am in no way a selfish person.  Those who know me well will tell you that's mostly true.  That being said, I picked up the phone on my desk the other afternoon and called my boyfriend, as I frequently do, to ask him what he wanted for dinner that night.  I prefer to let him pick, although you could argue this is slightly selfish of me, if only because should what I make end up tasting awful, I can blame him for picking it in the first place.  "I don't care," came the response (no one ever accused either of us of being decisive).  So, I offered up a choice, knowing no matter what was chosen I'd have to stop at the market on my way home.

"Do you want steak and smashed fingerling potatoes or pork chops with apples," was the question posed to him, having spent the better part of my lunch break pouting over one of my many cook books.  "Oooh.  Steak.  Definitely steak."  Gay or not, we're still men, and men love their meat and potatoes.  After immediately blocking out the image of the obnoxious bald guy from the "Meat and Potatoes" show on Food Network who makes me want to gauge my ears ("Meat, meat, meaty-dee, meat, meat," in that nasally voice that does nothing but want to induce a Van Gogh moment of cutting my ear off) and eyes (Ugh... that bald head and those glasses!) out, I settle on Broiled Tenderloin Steaks with Ginger-Hoisin Glaze  and Sauteed Mushrooms with Garlic Ranch Smashed Potatoes.  Make sure to read through to the end, though, because this will be my first admittance of room for improvement.

Ginger-Hoisin Glazed Steaks
  • 1 1/2 tbsp hoisin sauce
  • 1 1/2 tsp grated peeled fresh ginger
  • 1 1/2 tsp honey
  • 1 1/2 tsp low-sodium soy sauce
  • 1 tsp teriyaki sauce
  • 1/2 tsp crushed red pepper
  • 4 (4-ounce) beef tenderloins
  • Salt (to taste)

 Sauteed Mushrooms
  • 1 Package of sliced Cremini Mushrooms
  • 1 tbsp butter
  • 1 tbsp Marsala wine
  • 1 tbsp low-sodium soy sauce

Garlic Ranch Smashed Potatoes
  • 3 lbs fingerling potatoes
  • 1/2 cup light ranch dressing
  • 1/4 cup fresh Parmesan cheese, grated
  • 5 cloves of garlic, minced
  • Salt


First, preheat your broiler to high.  Next, place the fingerling potatoes in a pot and fill with cold water until the potatoes are just covered.  Season with salt.  Bring to a boil and then cover and let cook for an additional 15 minutes, or until potatoes are tender.


While the potatoes are cooking, combine the hoisin sauce, ginger, honey, soy sauce, teriyaki sauce and crushed red pepper in a small bowl, stirring with a whisk to combine.


Next, place the steaks on a foil-lined broiler pan coated with cooking spray (trust me on the foil lining whenever broiling - it makes clean up infinitely easier at the end of the evening!); sprinkle with salt.  Broil the steaks about 5 inches from the heat for 2 minutes, and then turn them.  Broil for an additional 2 minutes.  Now, remove the steaks from the oven and flip them again.  Before placing them back in the oven, brush them with half of your hoisin glaze.  Broil for 1 more additional minute.  Remove the steaks and turn them again, brushing the other side with the remaining hoisin glaze; broil for an additional 2 minutes for a nice medium rare steak, or until cooked to your desired temperature.


While the steaks are broiling, add your mushrooms, butter and wine to a medium sized skillet over medium-low heat and saute, stirring frequently, until the juice begins to thicken and the mushrooms are soft, about 5-6 minutes.  Once done, reduce the heat to low to keep warm until steak and potatoes are plated, stirring occasionally to prevent burning.


Once the potatoes are done boiling, drain them and place them in a bowl you don't mind using a potato masher in (if using non-stick pans, you should never use any metal spoon or kitchen utensil in them as they may scratch your non-stick coating, thus defeating the purpose of the pan...).  Alternatively, you can use a KitchenAid mixer (or any stand or hand mixer) if you wish.  I just prefer my handy potato masher since I like to leave lumps in my mashed potatoes.  Once you have them mashed or beaten to the consistency you prefer, stir in your ranch dressing, garlic and Parmesan cheese.

For plating this dish, put a heaping scoop of potato down in the center of your plate and flatten off the top, spreading the potatoes out until the scoop on the plate is roughly a wide as your steak.  Next, place the steak on top of the potatoes.  This will help to keep your potatoes warm and makes the plate look a little less busy.  Lastly, pour some of your mushrooms over the top of your steak.  For garnish, feel free to through a little bit of minced parsley around the edge of one part of your plate.  It adds a fresh earthy tone to the dish as well.


I served this dish with a beer for me, because really, what goes better with meat and potatoes than beer?  You could also serve it with a nice glass of red wine.  Then there is my boyfriend who seems to drink only gin martinis.  They go with everything, apparently!

So, now that you've made dinner, plated it, had a drink or two and eaten, you probably realized the same thing I did.  The potatoes did NOT go with this dish at all!  While I do love them, the flavor did not match the Asian infused glaze on the steaks.  Next time, I will be forgoing the the ranch and Parmesan, opting instead to throw in a little of the Marsala wine, butter and a splash of soy sauce to make them slightly less dense, with some diced and sauteed mushrooms added for texture.  Let me know what you think, or what your suggestions are as well!  Comment on this post and share them with everyone!

Until next time, happy eating!